There are some key steps and tips to follow when gluing a mirror to the wall.
1| Firstly make sure the back of the mirror and the wall surface that you are fixing onto are clean and free of dust. We recommend that you wipe down both surfaces prior to installation.
2 | Mark out on the wall where the mirror is going to be installed. This would typically be centred over the vanity. Pay particular attention to the height, you don’t want the mirror to high or to low.
3 | Use some double sided mirror tape on the back side of the mirror, this will help hold it to the wall while the glue dries. Do not rely on tape only, you will need glue as well for a long lasting bond. Run these strips of tape vertically on the mirror.
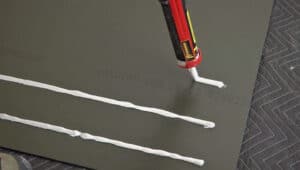
4 | Glue up the back of the mirror with long beads of glue. Like the tape, these need to be run vertically rather then horizontally. The reason for this is that any moisture that runs down the wall behind the mirror then doesn’t get trapped on the glue lines.
5 | Make sure that you are using a glue that is recommend for installing mirrors. Some glues contain certain acids which eat away at the backing on the mirror which will cause spots to appear on your mirror.
6 | Remove the film on the double sided tape and place the mirror against the wall. Once you are sure that it is in the right position and you have checked that it is level press it firmly against the wall. Make sure you press it firmly over the whole mirror so that both the glue and the tape bonds to the wall.
7 | Use some props placed on the vanity below the mirror to support the mirror from sliding down the wall. It is also recommended to use some strips of tape to run across the corners of the mirror to help hold it back against the wall while the glue dries.
8 | Follow the glue manufacturers specifications on the required drying time for the glue before removing the tape and the props from below the mirror.
Your new mirror will now be securely fixed in place in your bathroom.