Thermomirror demisters are simple to install behind most mirrors except mirrors that have a backing that cannot be removed to access the rear of the glass. Full installation instructions can be found here however we have put together some handy install tips and FAQ’s for your convenience below.
Install tips:
- When choosing a mirror demister for glue to wall mirror always make sure it is at least 100mm smaller in dimensions then the mirror itself. This is to allow enough adhesion between the mirror itself and the wall and not to rely on the adhesion between the demister and wall. You can have multiple demisters wired in parallel, if required, on a large mirror. When choosing a mirror demister for a hanging mirror make sure the demister is small enough to fit within and hangers or mounts on the back of the mirror.
- In many instances customers are only looking to have a clear section of vision on the mirrors similar to the area you rub clear with your hand after a hot shower and can choose a lot smaller demister pad than the mirror size and still be very happy with the result.
- Demister pads draw minimal power and are usually switched with the light switch, so they go on and off with the lights and you don’t have to remember as such to turn off the demister. As an example, a 600×800 demister will cost less than 1 cent per hour to run
- You can also connect the demister to a movement sensor in the ceiling, so it only comes on when you are in the room.
- Thermomirror demister pads come with a lead and 2 pin plug which allows you to have the wiring done ahead of time by the electrician and then add the demister and mirror later and simply plug the 2 parts of the demister system together. This means you can easily remove the mirror from the wall if needed as well.
- Thermomirror demister pads are self-adhesive for easy application to the mirror.
- When gluing mirrors to the wall always run the adhesive in vertical beads so any moisture that may accumulate behind the mirror can drain away.
Frequently Asked Questions:
Q: Can I install a mirror demister in my shower?
A: Yes! We recommend in this application to use a 12-volt demister and these are available in 300x300mm size to fit in a shower niche or behind a wall mirror. For more details on the 12Volt demister click here.
Q: How do I turn the demister on and off?
A: In most applications the electrician would wire the demister into the light switch and its therefore on whenever the bathroom light is on. Alternatively, you can wire it to a separate switch or a movement sensor in the ceiling.
Q: Can I cut the demister down to size?
A: No, you cannot cut the pads at all however there are a range of sizes to suit most mirrors and you do not need the demister the full sizer of the mirror to give a good clear area of mirror.
Q: Can the demister damage the mirror?
A: No, the demister only puts out a gentle heat that is regulated and will not overheat or damage the mirror. In fact by emitting this gentle heat it keeps the mirror drier and prevents the build-up of moisture thus preserving the life of the mirror.
Q: Are mirrors demisters expensive to run.
A: No, the demisters are very low wattage and energy efficient. As an example, a 600×800 demister will cost less than 1 cent per hour to run.
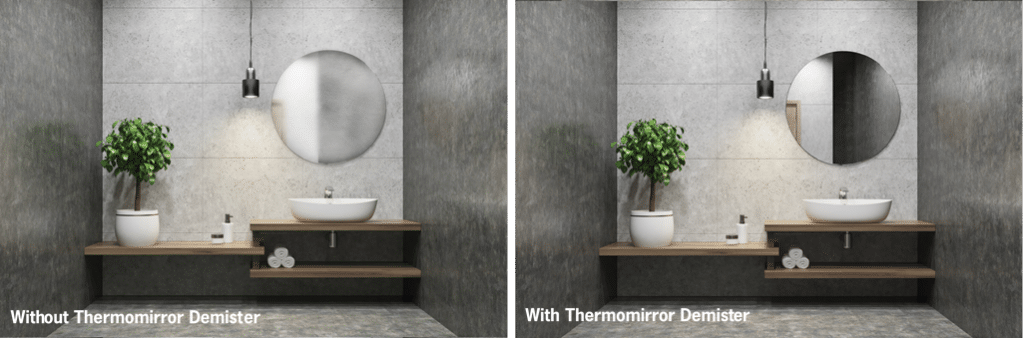
Do away with fogged up mirrors in your bathroom today, view the range of Thermomirror mirror demisters here.